Thursday, July 2, 2009
Election page is open!
The AUGI Special Election voting page is now live, and will be open until July 12, 2009. I encourage all AUGI members to carefully consider the candidates and make your voice heard.

Wednesday, June 24, 2009
AUGI Board Candidate Forums are now open!
I'm very happy to announce that I was selected as a candidate for the special election for the AUGI Board of directors.
The Board candidate forums are now open. To link to the main discussion forums go here. To view my profile and see my responses to the questionnaire go to this page.
Since these forums are heavily moderated your questions will be reviewed before they are posted. If your question is denied or if you need clarification on one of my answers please feel free to contact me. Within AUGI you can send a Private message or you can me an email at augi.doggie@gmail.com.
Even if you only read the responses I still strongly urge you to vote when the polls open on June 29, 2009.
I'm also happy to announce that the much anticipated AUGI AEC Edge magazine has released it's first issue.
The Board candidate forums are now open. To link to the main discussion forums go here. To view my profile and see my responses to the questionnaire go to this page.
Since these forums are heavily moderated your questions will be reviewed before they are posted. If your question is denied or if you need clarification on one of my answers please feel free to contact me. Within AUGI you can send a Private message or you can me an email at augi.doggie@gmail.com.
Even if you only read the responses I still strongly urge you to vote when the polls open on June 29, 2009.
I'm also happy to announce that the much anticipated AUGI AEC Edge magazine has released it's first issue.
Wednesday, June 3, 2009
I'm happy to announce that the AUGI Training Program is offering some new courses this month. ATP Courses for June 2009 are posted online and start next week (2009-6-08). So it's not to late to sign up.
ATP246 - What’s new in Revit Architecture 2010 - This three part class is designed to introduce you to the new features of Revit Architecture 2010. If you are new to Revit, or a pro, this class will define the differences between the old and the new.
ATP250 - FIELD of Study - In this class you will learn what an AutoCAD Field is, what functions they serve, and how they work. You will also discover what Fields are capable of doing and their limitations.
ATP249 - What's new in AutoCAD 2010 Once again, each new year brings a new release of AutoCAD. This course will provide an in-depth look at the new features and enhancements in AutoCAD 2010.
To Register go to the Current ATP Courses page. Note: You must be a member of AUGI to register for ATP classes. Membership is free.
ATP246 - What’s new in Revit Architecture 2010 - This three part class is designed to introduce you to the new features of Revit Architecture 2010. If you are new to Revit, or a pro, this class will define the differences between the old and the new.
ATP250 - FIELD of Study - In this class you will learn what an AutoCAD Field is, what functions they serve, and how they work. You will also discover what Fields are capable of doing and their limitations.
ATP249 - What's new in AutoCAD 2010 Once again, each new year brings a new release of AutoCAD. This course will provide an in-depth look at the new features and enhancements in AutoCAD 2010.
To Register go to the Current ATP Courses page. Note: You must be a member of AUGI to register for ATP classes. Membership is free.
Friday, May 8, 2009
The best commands you're not using (Part 2)
Since my last post covering some of the old “new” commands that people aren’t using, ended with Dynamic input, it seems logical to continue on with some more of the same. Here’s a deeper look at some of the commands that you can use with the Dynamic input feature.
Object Snap Tracking

Object Snap Tracking
Object Snap Tracking helps you draw objects at specific angles o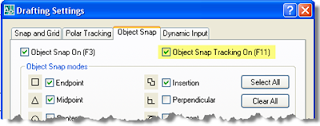 r in relation to other objects. When you turn on Object Snap Tracking, by pressing F11 or clicking on Otrack on the status bar, it uses AutoCAD’s trademarked AutoTrack technology to create temporary alignment paths. This will help you create objects at precise positions and angles relative to a snapped object.
Object Snap Tracking works based on the current object snap settings. You must enable Osnaps before you can track from an object's snap point.
 r in relation to other objects. When you turn on Object Snap Tracking, by pressing F11 or clicking on Otrack on the status bar, it uses AutoCAD’s trademarked AutoTrack technology to create temporary alignment paths. This will help you create objects at precise positions and angles relative to a snapped object.
Object Snap Tracking works based on the current object snap settings. You must enable Osnaps before you can track from an object's snap point.

You can change the settings by clicking on Osnap in the status bar, right click and select the Settings option. There is a toggle, highlighted in the figure above, in the Object Snap tab that will also activate Object Snap Tracking.
In the figure below, the Endpoint object snap is on. You start a line, as you normally would, by clicking its start point. In this example, we will be selecting the corner of the wall as our acquired point.

Move the cursor over the other line's endpoint to acquire it. You do not need to click on it, simply let it hover over the point until it is acquired. Acquired points display a small plus sign, shown in the figure above.

After you acquire a point, horizontal, vertical, or polar alignment paths relative to the point are displayed as you move the cursor over their drawing paths. You can acquire up to seven tracking points at a time.
Polar Tracking
Polar Tracking snaps the cursor to specified polar angles. You can use polar tracking to display temporary alignment paths defined by the angles you specify. In 3D views, polar tracking additionally provides an alignment path in the negative and positive Z (up and down) directions.
Polar angles are relative to the orientation of the current UCS and use that X orientation as the base 0 angle. As you move your cursor, alignment paths and tooltips are displayed when you move the cursor over the specified polar angles. Use the alignment path and tooltip to draw your object.

For example if you click on the Polar button in the status bar, right click and select Settings. Set the Polar Angle Settings to a 45-degree polar angle increment, an alignment path and tooltip are displayed when your cursor crosses the 0 or 45-degree angle. The alignment path and tooltip disappear when you move the cursor away from the angle and reappear near the next angle.
These can be quite handy when using the object snap tracking and polar tracking together. You can acquire the object snap tracking point and track at a polar tracking angle from that point.
Conclusion
There is a slightly different feel to using these commands. When you’re drawing, the cursor will have a lot more information floating around it. But once you get used to the new look and feel you’ll find that these commands can be a huge help. Try to take a little time to check out; you might be pleasantly surprised at what you find.
Thursday, April 23, 2009
The best commands that you’re not using
There are so many commands in AutoCAD that even the most experienced users don’t use a lot of the tools that are available. More often than not, I’ll show some of my AutoCAD users a command to make their work a little easier and the response is almost always “Wow, is that a new command?” Since it’s a new year, I figure this might be the perfect time to take a fresh look at some of the old “new” commands that a lot of AutoCAD users don’t always take advantage of.

Dynamic Input is a powerful tool that provides a command interface near the cursor. This will help you keep your focus in the drawing area, and not looking down at the command window as often, ever second that you’re not looking at the screen is time lost.
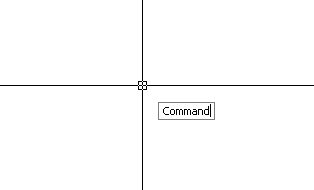
The figure above shows the Dynamic Prompt, this allows you to type in commands without using the command window. Dynamic Input is not designed to replace the command window, but it will allow you to hide the command window to add more precious screen area for drawing.
When Dynamic Input is on, tooltips display information near the cursor that is dynamically updated as the cursor moves.
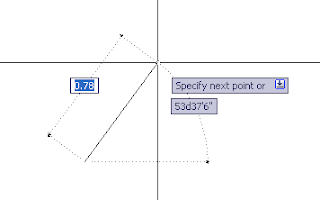
When a command is active, the tooltips provide a place for user entry. This is referred to as Dimension Input when drawing an object that requires a distance or angle. If a command requires a point or a coordinate input it is referred to as Pointer Input.
After you type a value in an input field and press the TAB button the field then displays a lock icon, and the cursor is constrained by the value that you entered. You can then enter a value for the second input field.
If you type a value in the first input field and press ENTER, the second input field is ignored and the value is interpreted as direct distance entry.
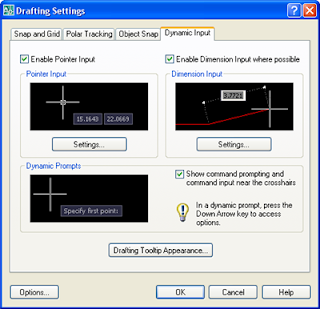
You can change the Dynamic Input settings by right clicking on DYN in the status bar and selecting the Settings option or by typing Dsettings at the command prompt. The figure above shows the Dynamic Input settings that allow you to modify the format and appearance of the Dynamic tooltips. These will give you the options to fine tune the Dynamic Input options to exactly what you want it to look like and how you want it to function, including the color and Transparency of the tool tips. I suggest taking some time to investigate the different settings, you might be pleasantly surprised.
Match Properties
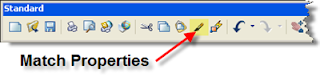
Tucked away comfortably in the Standard toolbar is the Match Properties command, highlighted in the figure to the right. This command does exactly what the name claims; it matches the properties of a Target object to that of a Source object.

After picking the Match Properties icon, or typing MATCHPROP at the command line, you will be prompted to select a source object. This is the object whose properties you want to copy to other objects.
Once this object is selected, you can either select the target object or type S to open the Settings dialog. Settings allows you to pick which object attributes you want or don’t want copied to the target objects. By default, all of the properties will be selected. If you don't want a specific property or properties to be applied to the new object, use the Settings option to suppress the copying of that property to the new object. You can also choose the Settings option at any time while the command is running.
Once this object is selected, you can either select the target object or type S to open the Settings dialog. Settings allows you to pick which object attributes you want or don’t want copied to the target objects. By default, all of the properties will be selected. If you don't want a specific property or properties to be applied to the new object, use the Settings option to suppress the copying of that property to the new object. You can also choose the Settings option at any time while the command is running.

The properties are broken down into two categories, Basic and special properties. Basic properties are simply the properties that almost all objects in a drawing will have. The Special Properties will only apply to certain objects in the drawing, these are also selected by default when you first run the command.
Note: In versions prior to 2008, the Multileader toggle is not listed in the Special Properties section.
Note: In versions prior to 2008, the Multileader toggle is not listed in the Special Properties section.
Dynamic Input
Dynamic Input is a powerful tool that provides a command interface near the cursor. This will help you keep your focus in the drawing area, and not looking down at the command window as often, ever second that you’re not looking at the screen is time lost.

The figure above shows the Dynamic Prompt, this allows you to type in commands without using the command window. Dynamic Input is not designed to replace the command window, but it will allow you to hide the command window to add more precious screen area for drawing.
When Dynamic Input is on, tooltips display information near the cursor that is dynamically updated as the cursor moves.

When a command is active, the tooltips provide a place for user entry. This is referred to as Dimension Input when drawing an object that requires a distance or angle. If a command requires a point or a coordinate input it is referred to as Pointer Input.
After you type a value in an input field and press the TAB button the field then displays a lock icon, and the cursor is constrained by the value that you entered. You can then enter a value for the second input field.
If you type a value in the first input field and press ENTER, the second input field is ignored and the value is interpreted as direct distance entry.

You can change the Dynamic Input settings by right clicking on DYN in the status bar and selecting the Settings option or by typing Dsettings at the command prompt. The figure above shows the Dynamic Input settings that allow you to modify the format and appearance of the Dynamic tooltips. These will give you the options to fine tune the Dynamic Input options to exactly what you want it to look like and how you want it to function, including the color and Transparency of the tool tips. I suggest taking some time to investigate the different settings, you might be pleasantly surprised.
Monday, April 13, 2009
Reading your Manager's mind
What CAD managers, or supervisors, would like to see out of a novice CAD user is likely not what you would always expect. A while back I posted a thread in the AUGI CAD managers forum to see what they thought I should focus on for a class I was writing. I was surprised to see how many of them were saying the same things I was already planning on saying. Here is a list of good general drafting practices that I've compiled after discussions with other CAD managers.
- None of the CAD Managers said I want someone who’s fast. It’s easy to want more speed so you can prove yourself at the new job. Experienced drafters and CAD Managers often see someone who is clicking their mouse like they’re playing a video game as someone who has potential to make mistakes. You don’t want them to have that impression of you.
- Always remember doing it fast twice is still slower that doing it carefully once. Don’t just work fast, work smart and find the right tool (command) for the job.
- If you find yourself saying “there must be a better way to do this” then you’re probably right. There is almost always more than one way to do something in AutoCAD. There may be a faster way that is worth investing a minute or two to discover.
- If you’re not sure about something, don't be afraid to ask a question. But only ask it once. Write down the answer so you can look it up later. There is such a thing as a stupid question; it’s the one you don’t ask, or the one you ask several times.
- Always check your plots before turning it in to the Engineer or Architect who gave it to you. Sometimes a mistake is obvious on paper that isn’t obvious on the screen.
- Always spell check a drawing before plotting it. Even someone with exceptional spelling skills can transpose letters when typing.
Saturday, April 11, 2009
Welcome to my AutoCAD blog
Welcome to my AutoCAD power user Blog. This Blog is dedcated to showing AutoCAD users Tips Tricks and best practices to teach novice users the keys to being a power user.
Subscribe to:
Posts (Atom)

