There are so many commands in AutoCAD that even the most experienced users don’t use a lot of the tools that are available. More often than not, I’ll show some of my AutoCAD users a command to make their work a little easier and the response is almost always “Wow, is that a new command?” Since it’s a new year, I figure this might be the perfect time to take a fresh look at some of the old “new” commands that a lot of AutoCAD users don’t always take advantage of.

Dynamic Input is a powerful tool that provides a command interface near the cursor. This will help you keep your focus in the drawing area, and not looking down at the command window as often, ever second that you’re not looking at the screen is time lost.

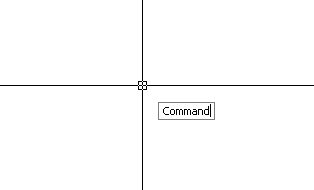
The figure above shows the Dynamic Prompt, this allows you to type in commands without using the command window. Dynamic Input is not designed to replace the command window, but it will allow you to hide the command window to add more precious screen area for drawing.
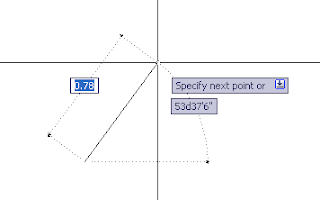
When Dynamic Input is on, tooltips display information near the cursor that is dynamically updated as the cursor moves.

When a command is active, the tooltips provide a place for user entry. This is referred to as Dimension Input when drawing an object that requires a distance or angle. If a command requires a point or a coordinate input it is referred to as Pointer Input.
After you type a value in an input field and press the TAB button the field then displays a lock icon, and the cursor is constrained by the value that you entered. You can then enter a value for the second input field.
If you type a value in the first input field and press ENTER, the second input field is ignored and the value is interpreted as direct distance entry.

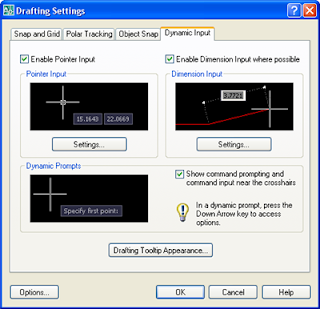
You can change the Dynamic Input settings by right clicking on DYN in the status bar and selecting the Settings option or by typing Dsettings at the command prompt. The figure above shows the Dynamic Input settings that allow you to modify the format and appearance of the Dynamic tooltips. These will give you the options to fine tune the Dynamic Input options to exactly what you want it to look like and how you want it to function, including the color and Transparency of the tool tips. I suggest taking some time to investigate the different settings, you might be pleasantly surprised.
Match Properties
Tucked away comfortably in the Standard toolbar is the Match Properties command, highlighted in the figure to the right. This command does exactly what the name claims; it matches the properties of a Target object to that of a Source object.

After picking the Match Properties icon, or typing MATCHPROP at the command line, you will be prompted to select a source object. This is the object whose properties you want to copy to other objects.
Once this object is selected, you can either select the target object or type S to open the Settings dialog. Settings allows you to pick which object attributes you want or don’t want copied to the target objects. By default, all of the properties will be selected. If you don't want a specific property or properties to be applied to the new object, use the Settings option to suppress the copying of that property to the new object. You can also choose the Settings option at any time while the command is running.
Once this object is selected, you can either select the target object or type S to open the Settings dialog. Settings allows you to pick which object attributes you want or don’t want copied to the target objects. By default, all of the properties will be selected. If you don't want a specific property or properties to be applied to the new object, use the Settings option to suppress the copying of that property to the new object. You can also choose the Settings option at any time while the command is running.
The properties are broken down into two categories, Basic and special properties. Basic properties are simply the properties that almost all objects in a drawing will have. The Special Properties will only apply to certain objects in the drawing, these are also selected by default when you first run the command.
Note: In versions prior to 2008, the Multileader toggle is not listed in the Special Properties section.
Note: In versions prior to 2008, the Multileader toggle is not listed in the Special Properties section.
Dynamic Input
Dynamic Input is a powerful tool that provides a command interface near the cursor. This will help you keep your focus in the drawing area, and not looking down at the command window as often, ever second that you’re not looking at the screen is time lost.

The figure above shows the Dynamic Prompt, this allows you to type in commands without using the command window. Dynamic Input is not designed to replace the command window, but it will allow you to hide the command window to add more precious screen area for drawing.
When Dynamic Input is on, tooltips display information near the cursor that is dynamically updated as the cursor moves.

When a command is active, the tooltips provide a place for user entry. This is referred to as Dimension Input when drawing an object that requires a distance or angle. If a command requires a point or a coordinate input it is referred to as Pointer Input.
After you type a value in an input field and press the TAB button the field then displays a lock icon, and the cursor is constrained by the value that you entered. You can then enter a value for the second input field.
If you type a value in the first input field and press ENTER, the second input field is ignored and the value is interpreted as direct distance entry.

You can change the Dynamic Input settings by right clicking on DYN in the status bar and selecting the Settings option or by typing Dsettings at the command prompt. The figure above shows the Dynamic Input settings that allow you to modify the format and appearance of the Dynamic tooltips. These will give you the options to fine tune the Dynamic Input options to exactly what you want it to look like and how you want it to function, including the color and Transparency of the tool tips. I suggest taking some time to investigate the different settings, you might be pleasantly surprised.


No comments:
Post a Comment